Cladding: how to get the fixing details just right
Published: 16/01/23 By: Mike Bekin
Installing timber cladding is not always a simple task. We have put together plenty of tips on how to build and maintain wooden garden decking in the past, but now is the time to focus on cladding. If you are using timber to protect your walls and add an aesthetically pleasant finish, here is everything you need to know to fix yours correctly.
A Note on Moisture Content
It is very important you know a little bit about moisture content before working with timber. For exterior uses, we recommend a moisture content of around 16% for most species. By installing your timber cladding at the right moisture level you can minimise movement of the wood, thus helping your cladding last longer and look better.
Corner Detailing Options
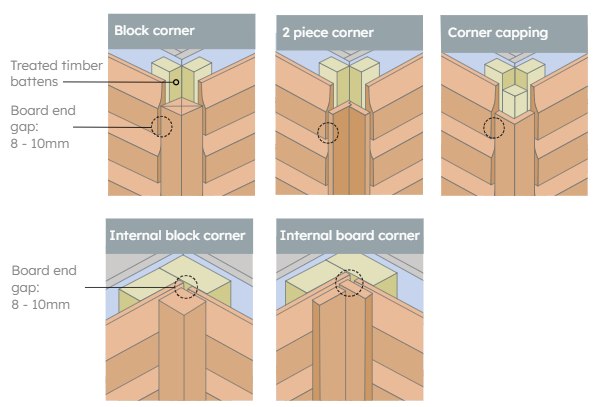
The corners of your building are likely to be the trickiest areas you will encounter, and knowing how to fix the timber at these points is essential before you begin installation. Here is a quick look at some of the options:
-
Solid timber corners – a solid vertical timber block is used at the corner
-
Covered corner – two custom-built boards meet at the corner to film a cover over the ends of the horizontal cladding boards
-
Flush cappings corner – the same as above but rather than covering, the custom boards are flush with the cladding
-
Re-entrant corner – an inverted corner plank made of two custom boards which move into the building rather than away from it

Source: TDCA
You can also simply have your horizontal boards meeting at the edges of your building. This is a sleeker, more contemporary look but can be more susceptible to wear and tear.
Face Fix and Secret Fix
The two main fixing methods for timber cladding are face fix and secret fix. Face fix is the more secure option, with screws going through the thickest area of the wood at every batten intersection (sometimes 2 screws/batten intersection).
However, many people do not like visible screws, so use secret fixing instead, assuming the chosen profile allows for this fixing option. This is a less secure option but more visually appealing. If secret fix is possible, it is imperative that one of our specially designed secret fix profiles is used, do not attempt to hide fixings in a standard tongue and groove profile.
Should You Use Nails or Screws For Timber Cladding?
If you are confused about whether to use nails or screws, you are not alone! This is a common question, and fortunately one which has a simple answer.
For softwood timber, stick to steel ring shank flat-headed annular nails or cut pointed screws. Hardwoods should be fixed with screws, and you should avoid any lost headed fixings.
Get More Advice From Our Team at EcoChoice
At EcoChoice, we are sustainable timber experts. If you need help choosing the right timber species for your cladding or a few tips for installation, we can help. Get in touch with us today and we will get back to you as soon as we can!
Image: Peter Turner Photography / Shutterstock.com
