Published: 30/10/24 By: Mike Bekin
Looking to level up your traditional woodworking skills? Getting to grips with carpentry joints is a brilliant way to enhance your woodworking techniques and create secure, stable timber products. One of the most popular styles to add to your repertoire is the mortise and tenon joint.
Start from scratch and work your way up to a fully functioning mortise and tenon joint in this easy-to-understand guide.
What Is a Mortise and Tenon Joint?
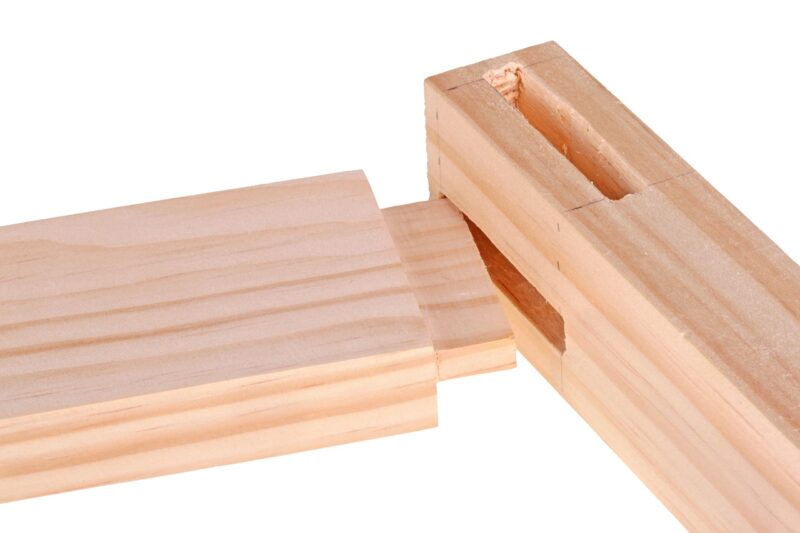
The mortise and tenon joint is a staple of carpentry, especially relevant in the traditional oak beam frame industry. The joint itself is made up of two parts that slot together perfectly, joining two separate pieces of wood. These parts are:
- The mortise: this is a rectangular area carved out of one of the pieces of timber.
- The tenon: this is the corresponding projection that fits perfectly into the mortise.
A mortise and tenon joint is ideal for creating super strong, interlocking connections between your timber. It is perfect for load-bearing objects, including tables, chairs and Oak beams, and is also frequently seen in window and door frame construction.
Before You Get Started
We are going to take a look at some step-by-step instructions to put together your mortise and tenon joint but before diving into those, we have some tips which should make your joinery easier.
The first is always to work with sharp tools, so be careful and follow appropriate health and safety guidance. Precise cuts are crucial for creating snug joints, ensuring your individual pieces of timber do not wiggle around or sit unevenly. Along the same line of thought, do not rush your cuts. A little bit of patience goes a long way to create accurate mortise and tenon joints.
Wood and Shop has a great video on cutting a tenon that shows precise cuts in action.
Even with sharp tools and accuracy, it’s still a smart idea to do a dry fit before glueing (if you intend to glue your joints). This makes sure that your joint is just right before you finalise it.
Step-by-Step Guide to Creating a Mortise and Tenon Joint
Get cracking with your first mortise and tenon joint with these step-by-step guidelines:
- Begin by planning the length and width of your mortise and tenon, marking each accurately on your sawn timber using a pencil. A rectangular stencil can make this simpler or you can use a ruler to mark out your location.
- Always carve out the mortise before the tenon. It is simple to adjust the tenon to fit the mortise, but not the other way around.
- You can use a drill press, chisel and mallet, or a router to carve out your mortise. It should have a width of around ⅓ of the timber board’s overall width for a strong joint suitable for Oak beams.
- Carefully cut your tenon using a saw, following your marked lines and always choosing to cut too large rather than too small. After your initial saw, you can use sandpaper to make your tenon slightly smaller and ensure a tight fight. For tenons which need a little more downsizing, opt for carefully planing the timber.
- Wood glue can help create a super tight fit which fills little gaps for a sturdier joint. Use a clamp to hold your mortise and tenon in place while the glue dries, being vigilant to ensure it is perfectly aligned. Check the glue is appropriate for the right timber species such as Oak or Douglas Fir.
Learn More at EcoChoice
At EcoChoice, we are experts in all things timber, including sourcing your wood sustainably. To continue your carpentry with a good conscience, take a peek at our timber products sourced from sustainably managed forests.
All our suppliers are independently certified by organisations including the FSC and PEFC, so you can be certain that the timber you are using to practise your mortise and tenon joints supports conservation, biodiversity and the end of illegal deforestation. To learn more, get in touch with our team today.
Tags: carpentry, Motise and Tenon joint, woodworking
Categories: Insights
